Posts

Showing posts from August, 2023

Air Dry Clay Ghosts Candle Holders

Image
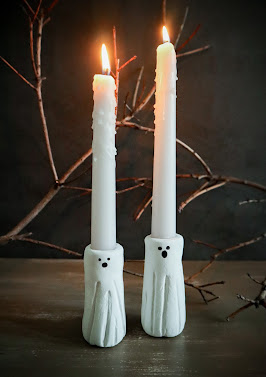
If you’re looking for a fun and simple “spooky” craft to add to your Halloween decor, these little ghosts candle holders are the perfect addition! If you would prefer to watch the tutorial, you can find it here on my YouTube:  https://youtu.be/SUeBVSYLlao I started this project by grabbing a large ball of my air dry clay (I used Sculpey for these, I also love DAS air dry clay!) Roll your clay around in your hands to warm it up. I think most people either don’t know or forget this step, but it’s really important to “knead” your air dry clay before working with it. You want it to soften a little. Once I had it warmed up, I started to roll it in my hands and on a cutting mat to shape it into a ghost. Just keep working with it until you have a ghost shape (a little slimmer on top than bottom). Be sure to flatten the bottom and the top of your ghost. Now I wanted to turn these into taper candle holders, so I grabbed some that I already had from the Dollar Tree. Then I very gently and carefu

Fall Grain Stripe Box

Image
  If you have some old wood boxes laying around or find one at a thrift store, I’m going to show you how to repurpose them into some beautiful vintage inspired Fall decor! If you prefer to watch the full tutorial and check out some other Fall pieces I made, you can watch the YouTube tutorial here:  https://youtu.be/Kjqo2o8NpAk I started with this old wood box I had in my stash. A deeper box will work best for this, but you can customize the design if you have a shallow box instead. I started by lightly sanding my box since there was a shiny sealer on mine. I sanded just enough to take that shine off so my paint would adhere and I removed the latch on the front and sat it aside. I painted it with two coats of Waverly White chalk paint. After it was completely dry, I went around the edges and corners with a fine grit sanding block to distress it. I wanted to add some grain stripes to my box so I just used some painters tape and spread it out where I wanted my stripes. I taped my box all

Vintage Fall Sign Using Carbon Paper

Image
  Did you know you can create your own signs just using inexpensive carbon paper from Amazon and a sharpie?! You don’t need any expensive equipment to make beautiful signs yourself! The best part is, you can design anything you want! If you want to watch the full tutorial, you can check out my YouTube here:  https://youtu.be/fPlJT_qCKts I started with this wood canvas that I got in the Dollar Tree Plus section. They usually have these at craft stores or you can grab any wood piece to make your sign. I decided to stain my wood canvas using wet acrylic paint. I just kept my brush wet while painting with a brown/tan color that I mixed up. You can just use stain or paint it if you’d prefer, but I love using this technique to stain. After painting the entire thing with the wet acrylic paint, I wiped off any excess with a paper towel and let it completely dry before moving to the next step. I used photoshop to create my own autumn market sign. If you don’t have photoshop, there are free webs

Pumpkin clock

Image
  Want to create a high end piece for Fall?! Check out this stacked pumpkin clock I made recently with just a few products!  If you’d prefer to watch my tutorial on YouTube, you can check it out here:  https://youtu.be/ui9vcvpebxU You’ll need two styrofoam pumpkins for this project. I bought a pack off of Amazon that had varying sizes, but Dollar Store foam pumpkins would work just as well. Just make sure you get a smaller one to stack on the larger one. I also purchased this clock insert from Amazon too. Again, you can find these at Hobby Lobby or other craft stores usually. This one is 2.4 inches and fit my larger pumpkin perfectly. Remove the stem of the larger pumpkin then lay your clock face where you are going to want it. On the back side of the clock face, there’s a battery pack. Trace around the battery pack, not the face itself. You’re gonna want your hole just big enough to pop the battery pack in. Then I used a box cutter (you can use any sharp tool) to cut out the piece fro