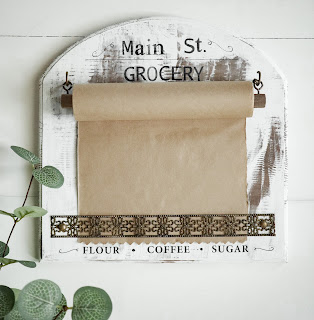
Supplies:
Wood plaque/Board
Wooden dowel
Brown craft/packing paper roll
Eye hooks
J hooks
Metal Ribbon or something to hold paper down
Rub on transfers/stamps
This “vintage” inspired grocery list is so easy to make and it’s super cute! If you’d like to watch the video tutorial instead, you can check it out on my YouTube here:
https://youtu.be/-qzw_sKafy4
I started out with one of these wood plaques from the Dollar Tree plus section. You don’t have to get this exact plaque and most hobby/craft stores have cheap wood pieces you could use instead.
Now, unfortunately I erased the footage of prepping my plaque sign piece, but all I did was paint it brown then do the white school glue chippy look with some white chalk paint on top. I let it dry to crackle a bit and then I used a paint scrapper to scrap some paint off to really give it an aged appearance.
Here’s how it looked after it dried (and where my footage for this project starts lol)
I pulled out some of my alphabet stamps (from Amazon) and two different rub on transfer sheets from Dollar Tree.
I wanted this to look like a vintage grocery store sign/grocery list so I started out by using my stamps to put “Main St.” at the top of my plaque. One of my sheets of rub on transfers had some little decorative swirly lines so I used two next to the Main St. to give it some decoration.
Then I grabbed my other rub on sheet which had 3 rub ons that said “coffee, flour, and sugar” and I thought those would be perfect for the bottom so I cut those out and lined them up evenly before using a craft stick to rub those on the bottom.
Then I went back to the top and used my alphabet stamps again to put “Grocery” under “Main St.”
I wanted a little separation between the words at the bottom so I just used a sharpie to add little dots between them. I also added a few more of those swirly line rub on transfers at the bottom.
I also separated the top words with a thin black line using my sharpie here too.
To turn this into a grocery list, I grabbed some of this brown craft/packing paper that I got from Dollar Tree and I just cut it down to fit on my wood piece.
You’ll also need a dowel to hang your brown paper roll from. I buy these larger dowels on Amazon in bulk, but again you can find them at craft supply stores or you can just use a skinnier one from Dollar Tree. The paper isn’t heavy so the thinner ones would probably work fine. Again, I cut this dowel down to fit the plaque. A little longer than my paper roll.
I stained my dowel with some brown watered down paint and wiped the excess off with a paper towel.
You’re also going to need something to hold your paper down at the bottom of the plaque so that your paper doesn’t roll up. I used this metal ribbon that I found at Dollar Tree, but you can use anything from ribbon, a piece of leather or elastic, or even a piece of thin wood.
I wanted my silver metal ribbon to be gold/bronze though so I sponged some black paint onto it then once it was dry, I used some European Gold Rub N Buff on it to make it a bronze color. (You might notice I have two pieces in the photo. I only ended up using one though).
Now it’s time to put our grocery list together! I grabbed two eye hooks (Amazon) and screwed them into my wood dowel (if you’re using a thinner dowel, I would suggest not using eye hooks. You can instead just hang your dowel in the J hooks).
I laid my dowel, with the eye hooks screwed in, on my plaque then used a pencil to mark inside the holes so I’d know where to put my J hooks.
Then screwed in my J hooks and hung my dowel from the eye hooks.
I rolled my paper down then put my metal ribbon on top of it at the bottom.
Then I just used some Gold thumb tacks to pin my metal ribbon down and that was it!


Comments
Post a Comment